Because I bought one so you do or don't have to.

Showing posts with label Review. Show all posts
Showing posts with label Review. Show all posts
Saturday, August 23, 2025
Monday, August 04, 2025
Friday, April 11, 2025
Midland 13-857: An Unexpected Joy
After the initial failure of the 13-853, I decided that I needed to send it off to a local CB shop for repair. In the meantime, I purchased 3 more 23-channel CBs for conversion - just in case :). One of them is a Midland 13-857 - the coolest CB radio I've ever owned.

Wednesday, January 08, 2025
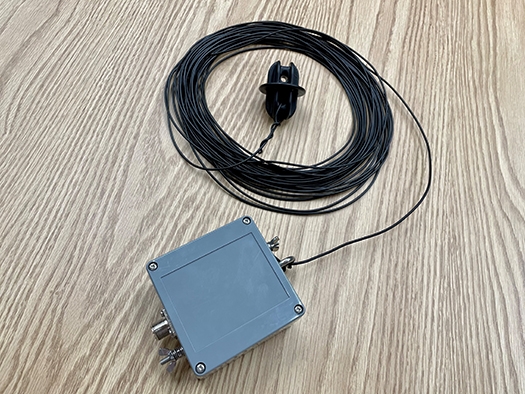
Balancing the Unbalanced Truth
Today and after many years of operating with an end fed antenna, I have learned that these antennas give off lots and lots of unwanted radiation, also known as common mode currents. So what's the answer? New antenna? More coax, less coax? Read on and I'll hopefully answer these questions!
Sunday, November 03, 2024
NightFire Electronics
A few days ago, I thought that I'd make another purchase off of AliExpress again. I went to the store and picked up a prepaid Visa card since that's what I used last time, only to discover that it was only valid in the US. Dang. Well there went $50...
Along Came Etsy
Now I know what you're thinking...why would you ever shop on Etsy, Owen? What do they have on there that's even remotely close to ham radio?
Well they have a lot actually. Hams are making things from antennas, LED signs, kits, apparel...the list goes on! What a great way to let the ham community shop for items while giving back to their fellow hams and their families! I might start making antennas and selling them on Etsy, actually.
Since I couldn't buy a Pixie kit on AliExpress due to my dilemma, I decided to go find another Pixie kit. I couldn't use eBay because they don't accept prepaid cards and Amazon just wouldn't recognize my card period. So I got to looking at other sites and Etsy came to mind. Sure enough, one supplier - NightFire Electronics - was one of the first seller choices. And right there it was - a 40 meter Pixie kit waiting for me to put it together. So I ordered that along with an audio Morse Code practice oscillator as another building activity.
The Waiting Game and Thoughts
I placed my order on October 26th and according to USPS, my package should arrive on October 29th - that's a pretty quick turnaround considering that NightFire Electronics is in Florida, which is continuing to clean up after Helene and Milton.
Despite this, my package arrived in a cute cube of a box. Nothing too grand, but sometimes the best things in life come in small packages. I went ahead and unboxed my pack of goodies and sure enough, the two kits I had ordered were provided as promised and promoted.
The Pixie
To my surprise, the Pixie isn't that much bigger than the generic ones you get off of eBay. The PCB is a bit thicker and seems a bit more robust too.
This one still uses varactor tuning but I have learned a lot about varactor tuning in the past few days. Basically, when a diode is placed backwards (cathode side towards the voltage source, anode to ground or negative source) it exhibits a phenomenon known as junction capacitance. As the voltage is increased or decreased, the capacitance varies. There are specific diodes that serve as varactors such as the MV209 used in the MFJ Cub, but common 1N400x series will work just fine if used as fine tuning, such as RIT. The Pixies use these diodes for varactor RIT tuning, which provides a small variable capacitance and receive offset of between 700 and 900Hz - perfect for copying CW! If you really wanted to, you could substitute an actual varactor in place of this to have a wider tuning window. You'd just have to adjust for offset every time you keyed up.
I purchased the Pixie kit with a base frequency of 7.030MHz. Now, I could keep buying up crystals and swapping them out to change frequencies, or I could use a variable capacitor to shift the frequency by about a kilohertz or so. Your mileage may vary, especially if you're using an HC49/U (tall-cased, more pull) versus an HC49/S (short-cased, small pull). Also, don't permanently solder in the crystal. You can use pin headers to easily change out crystals or VXO modules.
The Pixie did not come with any output jacks. Rather it was provided with four 2-pin screw terminal. This shouldn't be a problem and the input/output jacks should be relatively easy to come by. I already have tons of BNC panel mounts, a panel mount DC barrel jack, and several 3.5mm jacks.
This Pixie has an additional capacitor in parallel with the low pass filter inductor. You can add a value of 130pF to further attenuate spurious emissions, although the schematic says that this component isn't used. I find it to be absolutely necessary, as I have been thoroughly analyzing the ineffective output of the Pixie's filter. This capacitor helps significantly reduce the second harmonic to a dip, which thereby reduces the third, fourth, etc. by more than -25dB or so from the fundamental. It works because it is resonant on or near the second harmonic, which is 14MHz.
Code Practice Oscillator
While I liked my Arduino Nano CPO, it just wasn't small enough to tote around. I ended up purchasing another oscillator kit based on a twin-T oscillator configuration. This is fed into an LM386 to amplify the output, which is a sine wave at around 700Hz.
Depending upon the kit you have, you can change a resistor in one of the T-networks to change the tone. So if you're not comfortable with 700Hz you can experiment with resistor values to see what you like. As an added bonus, I'm thinking of adding on an Arduino to the key input to generate random words and phrases. A digital pin fed to an optocoupler and fed into the keying input should do the trick just fine.
Conclusions
Simply put, I will most definitely be buying more things from NightFire. I feel that they are reasonably priced and are dedicated to making electronic kits accessible for all. One kit that looks cool and is easy to assemble is their ghost detector. Whether or not it works...well, that's for you to decide. In practicality, it is an overly-amplified LED detector that picks up electromagnetic changes nearby.
That's not the only things NightFire offers. They offer everything from amplifiers, Arduino kits, capacitor/resistor kits, and so much more! So if you're looking for some fun kits to build either to pass the time or practice your soldering skills, look no further than NightFire Electronics!
Thursday, September 19, 2024
Realistic TRC-412 Emergency CB

It's an emergency CB radio! How ingenious! Guess who bought one? ME!!!
Tuesday, June 04, 2024
HamDashboard de VA3HDL
Jason, KM4ACK, has done it again. He's shown another really cool ham thing on his YT page - a ham-friendly dashboard!
If you're looking for a way to have ALL your ham radio internet-linked things at your fingertips, look no further than VA3HDL's Ham Radio Dashboard. All you need is a web browser to get started.
Monday, May 20, 2024
Putikeeg Key Review - Your first CW key
When I first got in to ham radio, I never thought too much about CW. At the time, I was glad that the requirement for copying Morse was tossed out. As I've gotten older and more seasoned in the hobby, I've come to appreciate CW and it's beginning to become one of my favorite modes.
Hams who are serious CW enthusiasts will spend hundreds, and sometimes thousands, on refined Morse Code keys. As someone who is more of a rudimentary kind of person, I prefer simplicity - the less adjustments needed, the better. Over the years I've 3D printed a key and crafted one from a clothespin. Both worked, but lacked the charm of a key like a J-38 or an old mini Soviet key.
In recent years, cheap yet promising keys hit the market from a manufacturer by the name of Putikeeg. These keys were described as being crafted from 6061 aluminum and came in straight key and paddle configurations. While I really wanted a paddle, I had some money set aside for a CW straight key. So, I took the plunge and ordered one from Amazon.
And, here is my review.
Thursday, February 29, 2024
QYT KT-8900: The UV-5R's Mobile Big Brother
I've decided to install a mobile-oriented radio in my brand-new-to-me vehicle. There are many on the market right now, but one caught my eye in particular:

This is the QYT KT-8900 VHF/UHF radio. It claims to run at 25W but let's be honest here, it will only run about 15, maybe even 10 watts. That's still not bad, considering that this is from - you guessed it - China. At just a little under $100, I decided to take the plunge and see how it would perform as a mobile rig.
First-Look Impressions
Initially, this radio had been riddled on YouTube, reviews, and forums with issues right off the bat. The worst of it was the final RF amplifier. The final is heavily overdriven in this application and normally, it would run at 6 or 7W max output. This works, however, these radios don't use heat sinks on the final, rather, they use a piece of "thermal foam" entrapped under a piece of brass. Despite having a fan on the rear, this is not enough to cool the final if the SWR happens to be mismatched. Some models don't even have a fan, so overheating is expected anyway. So, my first suggestion if you purchase this is to take the manufacturer's "heatsink" off, add a very minute dab of CPU compound and place an aluminum heatsink on top. Also, use a properly tuned 2m or 70cm antenna. Problem solved, heat dissipated, no SWR overload... for now...
Next, there have been complaints about this radio not being compatible with CHIRP. The supplied QYT software seems similar to CHIRP and it may do just fine with me. However, it is imperative that you install the PL2303 - this is the driver you need to program with the provided cable. If all else fails, it will program manually just like the UV-5R via the keypad. If you're on Mac or Linux, CHIRP will be your only software option.
UPDATE (10/22): It appears that CHIRP now works flawlessly with the radio I have. Previously, I could not edit any of the customized settings, such as the power-on message. This was due to an invalid BCD. In the 10-20 update, CHIRP appears to have resolved this problem and I can now adjust custom settings. Despite the model still being labeled "experimental driver," I think it's safe to say that CHIRP now can communicate with my radio without an issue.
Of course, if you'd rather, you can build your own using a <$5 CP2102 and a 3.5mm stereo (TRS) jack. The pinout is simple and building one is just as easy. The tip is TxD (RxD on CP2102), ring is RxD (TxD on CP2102), and sleeve is ground. If you find that it doesn't work, try swapping Tx and Rx pins. Some modules may be wired backwards. As an added protection against power cycling during programming, 10K resistors can be added between the serial pins and ground.
I've also heard that the included microphones with these have very poor audio quality and I have found a minimal amount of modifications to fix this. The solution, obviously, is to use a different microphone. I suggest using Kenwood's line of RJ-45 mics - this should solve the problem. For a better money saver, there is an SMD resistor (value 332, 3.3kOhm) that can be lifted from one pad or, as a better solution, removed completely and replaced with a 5K pot, as shown in this Facebook post here (click the photo for better resolution):

One other issue I've heard is that these don't work the best as mobiles and will pick up everything from vehicular EMI/RFI as well as pager systems if you town uses them. The obvious answer to this, in my experience and opinion, is to use as many ferrites as you can. Wrap the DC cable in a snap-on ferrite about 3 or 4 times and place a few on the antenna coax as well at the radio end. This should mitigate some issues, but your mileage may vary.
The issue of having only one 3.5mm jack appears to be resolved. It was previously mentioned on various forums and sites around the internet that this radio lacked an audio out jack. The rear one, at least on mine, is indeed an external speaker output which will mute the top speaker. The front is the programming jack.
Lastly, if you need to replace the final for peace of mind, or if you experience a thermal burnout (aka, releasing the magic smoke demons), this page details the how-to. It's not entirely difficult and the part I'd replace it with would be this one at DigiKey. It is better suited for this radio (16W output vs only 6W output) than the claimed factory one and is well under $10. For now, I will put a modified heatsink on the factory chip with a dot of CPU paste as I mentioned above and turn down the middlemost potentiometer to achieve a maximum of 10W output, as seen in the screenshot below. This should save the final until I can replace it with the better one. And for reassurance, the Leixen brand radios of the same size also utilize this much power output.

Despite this, I purchased one just to see how bad (or even good...) these are. I do have high hopes, but we'll see if the product delivers. Have they improved quality control over the past 10 years or will it still scream "Made in China?"
So here we go - my review.
My Thoughts
Instead of using a UV-5R as a mobile, why wouldn't I use a mobile-specific radio that is about the same size and can push out around 10 or even 20 watts? I think I will also hold on to my UV-5R as an HT and use the TK-705 (IF I EVER GET IT FIXED!!!) for APRS since it's pretty well scrapped. The final stage on it and APC stage are both completely useless at this point so I might have a few ideas to push some watts out.
Here's what I like about the 8900, according to the claims:
- Small profile - easy to affix anywhere in your car or truck. For extra security, you could even put it beneath a seat out of sight! It's literally as big as a slice or two of bread.
- Ease of use - If you started off with a Baofeng UV-5R, you'll have no issues moving to this as a mobile radio - they're the same thing and have the same menus and interfaces!
- Dual or Tri-band - If you use 220MHz or the 1.25m band, you'll be happy to know that this is also offered as a 2m/1.25m/70cm model, though 2m and 70cm is plenty active around my area.
- Cooling fan - After the final stage complaint, I'd say the company(ies) tried to fix the issue, but in any case, a cooling fan is a must. A simple modification can be found on the link to replace the final above.
- CTCSS, DCS, DTMF, etc. -compliant - you can't really do repeater work without this!
- Safe-for-car power draw - Rated at 4 to 5A max on transmit, some claim at most 7A. The average load a 12V auto outlet can hold is around 10A (an average of 12V @ 120W. At least that's what cars I've been in can handle...). On standby, expect no more than 200 or 300mA.
- LOUD audio output - Despite it's small size, the receiver has an excellent audio output via a ~2W top-mounted speaker.
- Built-in FM radio - Works from 65 to 108MHz. Good for out in the field or if your car radio doesn't work well.
As with any radio, it also has it's flaws:
- Poor RF final choice - strictly speaking, constantly overdriving your severely underspec'd finals will wear them out within months or even weeks of high-power usage. I'm not really convinced the RF engineers (if there were any!!!) thought about this. The better replacement is around $7 on DigiKey, so that's a plus.
- Instruction manual - Good ol' Chinglish - even harder to learn than both Mandarin Chinese and English combined!!! Just look up some YouTube tutorials.
- SMD technology - Okay, this may not be a complaint, but I find SMDs very tedious to work with if something were to go wrong.
In all reality, that's all I can say about this radio! As you can tell, the pros outweigh the cons for me. Let's unbox and see what is inside...
Official Unboxing
I ordered the KT8900 from Amazon for $80.99. Included, it claims to have the radio, the DTMF microphone, a 12V cigarette lighter adapter, the mount and hardware, and a programming cable.
Right now, I plan on putting this in my new vehicle that I will be buying soon, but instead of permanently damaging the plasticized interior with screws, I would like to mount the bracket with a softer solution, namely, heavy-duty Command strips or Velcro. This should hold the radio up pretty well and shouldn't have a problem with any road vibrations or daily driving. Since this car has a bench seat, there is a good-sized crevice up front that would house this radio pretty well! Less than a foot away is the 12V outlet. In addition, I will be using a standard magnet mount dual band antenna.
Unboxing it, I was pleased from the start. The radio and all its components were packaged nice and neat. I was impressed with the size and I must say it is very compact!
I did want to open it to see what I was dealing with regarding the RF final. Turns out, it is a Mitsubishi RD07MUS2B MOSFET, but the NXP chip I mentioned should work just fine, and I will eventually get one later on. For now, I'll leave it as is, but I will be installing another heatsink. Yes, it did come with the cheap foamy stuff. The small micro-sized cooling fan provided will work just fine.
The receiver is quite crystal clear and it does have a relatively loud speaker, which is perfect if someone is driving at highway speeds. The microphone does seem relatively well built, but don't expect it to survive if it falls on the ground. The lighted keypad is perfect for nighttime driving and provides excellent visibility. The DTMF pad is soft and squishy, and does not seem too terribly hard to press. The PTT button, though clunky, works well. I am unsure about transmit audio since I didn't get around to testing it that far.
The controls are very sharp and I'm sure that this radio will last quite a while. As long as it is taken care of, I expect it to last me for as long as I need it and then some. And hey, if it doesn't work out in the car, I can always make a portable VHF/UHF station with a spare metal ammo can I have!
Final Thoughts
I was moreover impressed that the instructions were in full English with very little typing errors! It's nice to receive a manual that you can understand. Perhaps the QYT model has increased in the quality control department, but we won't know until I take it for a field test. I'm very positive and I'm sure this will do just fine for me.
I really overestimated the size of this thing - it truly does fit in the palm of my hand and I do not have large hands! It is very lightweight but durable enough for vehicular, mobile use with the frame being made out of pure metal. The loud, crisp speaker only improves the clarity of the received signals and I think that this one is a keeper for sure. Replacement parts are quite easy to come by as well, making this radio less of a headache to own.
I now need to make a Wal-Mart run to get some cable clips and Command strips. To save the final, I will probably turn this radio down to about 10W maximum output, which is sufficient for the stock final. The Leixen VV-898 mobile radio has this much power output and I've heard that people can hit repeaters with them over a fair distance away with even a cheap, mediocre antenna.
So, in conclusion, is the QYT KT-8900 worth it? Yes, absolutely. For the beginning Technician and/or those familar with the Baofeng, purchase one of these and use it until you can get a more reputable radio such as a Yaesu, Icom, or Kenwood. Who knows? You may still end up using this full-time in the end!
UPDATE (5/14): I have the radio installed in the car and so far, I am very impressed! I have a little bit of an occasional pop or crackle in the speaker that only comes on if the car is in motion, but it doesn't bother me at all. A filter capacitor on the 12V lines may remedy the issue, such as 10pF for high frequencies or 0.1uF for low-end frequencies. Reception is still clear and the volume is more than comfortable in an automobile setting. I am using a cheap mag mount antenna and I can hit the repeater anywhere in town. I did turn down the power to a value of 10W I assume, but I won't know until I get some more refined test equipment. All I know is that the fan doesn't come on when the radio is in high power for an extended period of time and there's no smoke or burnt smell, so that's a good sign!!!
UPDATE (5/21): Nowhere near 10W originally - more like 0.5W!!! I did turn it up to around 10W now, however, the fan does kick on. I do not really notice power loss as the transistor heats up, and I really don't think the transistor gets stupidly hot! So I think we're good!
To close, I would like to recommend a few things about this radio:
1. MITIGATE THE RF FINAL ISSUE - First and foremost. Either replace the heatsink, replace the module, turn down the power, or do a combination of these. You'd be very sad if you destroyed the final and had to spend a long time replacing it!
2. Keep it out of the sun - Don't put it on the dashboard of your car. Put it beneath a seat, down by the center console, under the arm rest - just as far away from sources of sunlight heat and UV as you can. Heat is the number 1 culprit of failure in this application.
3. Join support groups on Facebook, Groups.io, etc. - Just like the Baofengs, there is limited factory support. Consider joining groups and doing your research on these rigs. Facebook has at least two or three groups dedicated to the QYT line of radios.
4. Use a tuned antenna with an SWR of at most 1.5:1 or less - This will also help keep the radio operating for as long as possible by putting less stress on the final.
If you follow all of these pieces of advice, there's a good chance you'll keep your radio safe from harm for a long time, and this goes for all radios! Truly, the KT-8900 is an excellent base radio for new techs or for the ham that just wants an easy, inexpensive base radio.
That's about it from me for now! I'll see you in the next post!
Monday, February 06, 2023
Yaesu FT-891: Best for the Budget?

Okay, so maybe my base rig needed an update too. I get it; there are not enough options for someone on a budget like me, and unfortunately, ham radio isn't a budget hobby. Don't get me wrong, I LOVE my TS-660, but there's just something about not having 80, 40, or 20m access that makes hams grumble when you're trying to set up a sked or a QSO. Building QRP equipment is great, but 9 times out of 10 you'll be limited to CW-only designs (in addition to Feld Hell, too!). Most hams don't do CW or even Feld Hell, so you're left calling CQ for ages if you use those modes.
In 2016, a miracle happened. Yaesu unveiled a new radio capable of producing 100W out on SSB, CW, and FM (and 40W on AM, if you care!). The best thing about this rig was its size - anyone could take it anywhere, no matter the circumstances, and even if you had a bare minimum wage-paying job, HF would be within reach. Thus, the FT-891 was born. Styled like its predecessors, the FT-817/818, it packed more punch than any mobile rig of the same size could. And if you're worried about being badged "Made in China," don't worry - it's actually made and imported from Japan, where electronics of quality are born.
I remember when I got licensed in 2018, just 2 years after the reveal. I can vaguely remember me trying to save money for a bigger and badder radio than any other ham out there. Unfortunately, it didn't happen, but I did get my TS-660 and prior to that, I was given a SK's Yaesu FT-2200, one of the best 2m radios I've owned. There is no comparison between it and the Baofeng. Period.
Background on the Purchase
For a little under $700, I went ahead and took the plunge and bought the FT-891. Before I bought it I read through the reviews and every website gave it 4.8/5 stars. The number one complaint (minimal complaint) was the controls - the radio has a lot of menus to go through but I don't think I'll find it a problem.
I ordered from Ham Radio Outlet again since I have had nothing but excellent service. The MSRP was $639.95 without tax - even with tax, it still didn't break the bank like I thought it would. The package arrived within two days, which is REALLY fast although it came from the HRO store in Milwaukee.
Initial Thoughts and Unboxing!
I went ahead and unboxed the radio which I must say was packaged pretty well! In the box, I got the radio, the faceplate, the microphone, the power cables, and some hardware for mobile mounting. I did have to resurrect my Pyramid 30A PSU, which actually wasn't too bad for the little rig! The moment I turned it on, I noticed little to no switching noise - obviously this has a built-in PSU filter.
I actually didn't mind having to step through the menus, and after enough practice, I think I know my way around this radio already! Unfortunately, I did run into some problems.
The FT-891 does not have a built-in sound processor like some of the higher-model radios, but it does have CAT control. I also realized that in order to use my LDG auto-tuner, I needed a special 3.5mm plug - oops. But in all reality, I don't mind. I still have my Easy Digi board and I can choose to control the rig via CAT or an RS232 breakout board. Looks like a custom interface is in the works for the future!
I tried using the SignaLink, but to my dismay, it only transmitted audio - it did not have any sound going to the computer. Yaesu did put a data interface on the back of the radio. It is a 6-pin, mini-DIN connector, like what you'd find on old computer mice or keyboards. If you have any old ones laying around, consider scrapping the cable - it should work! Below is the pinout:

Facing the back of the radio, the only pins we need to focus on are the DATA Out (Audio TO Radio), PTT (or if using the built-in CAT, ignore this!), DATA In (Audio FROM Radio), and GND (Ground). While I won't go into detail, KM4NMP has an excellent write-up on making your own interface, minus the PTT/CAT control. Just plug in the radio via the USB port in the back, configure your software, and go! Make sure to also adjust ALC levels so you're not overdriving the radio!
Closing Thoughts and Recommendations
I absolutely love this radio and to be unbiased and honest, I have no critical complaints. I think that this radio would be an excellent starter radio. It can also be used as a base station or you can go portable, much like its predecessors, the 817, 818, 857, etc. With 100W of output, you are more than guaranteed to work the world wherever you are.
I would certainly recommend this radio to someone who's on a budget. It's a good radio whether you're new to the hobby or an operator who's seen some action. If QRP just isn't cutting it for you or you're constrained to only 2 or 3 bands, consider getting this radio. With some extra circuitry, this radio can run FT8, PSK31, Feld Hell, RTTY, etc. On the flip side, if you do enjoy QRPing, this radio can lower power levels down to 5 watts.
Conclusion and updates
For the record, I STILL cannot get RBN spots in the south despite putting out significantly more power. I'm trying to get to Alabama, but no cigar. I am clear from coast to coast, but it appears that no one down there reports me or can't hear me. It may be time for a new antenna setup, particularly one that points south. Better yet, I NEED MORE SPACE! Do you know how horrible it is to have your entire station antenna set up on less than a tenth of an acre, let alone indoors???
The weather up here in Maryville is starting to get warmer (hopefully it continues to!), and today the temp is about 52 degrees. I'm starting to get back into the swing of things at school and summer can't come soon enough!
Once I get an extended break (in about 4 weeks or so), I plan on taking my radio out to the university and will hopefully make some contacts. Until then, I'm bound to the books for now...
Sunday, January 01, 2023
The Cub Lives!!!!!! (For Real, This Time)
Yep, you read it right, the transceiver that I gave up on months and months ago sprang to life. I had a feeling that it wasn't dead, my heart of hearts told me that.
So, what happened, and what did I learn? Here's the important thing: There's more than one way to do something. Ben Franklin once said, "I didn't fail the test, I just found 100 ways of doing it wrong," and that's what I did.
With the help of various QRZ.com members, namely KL7KN, I figured out that the receiver can be adjusted with the probing of U2's Pin 1. U2 is an SA602 and is the filter mixer. Probing Pin 1 bypasses the filter circuit, which in essence creates another antenna. The antenna will generate a buzzing or hissing noise. From here, tune L1 and L2 for maximum noise. If you can't hear any stations when you bypass the filter, you still have a problem, unfortunately (once again, thanks A LOT KL7KN!).
I can't tell you how much joy I felt when I began to hear stations when I connected an antenna. It really made me happy when I could hear the FT8 frequency, which means that my tuning was dead on where I wanted it. I could also hear CW stations with ease.
By now, many of you are wondering how well this stacks up to the Pixie. I will tell you that it blows it out of the water completely. The Cub has a crystal filter, an onboard audio amplifier, a great tuning range, and about 2W of output power that can be varied if you want to work QRPp. While the Cub sounds impressive, there are some drawbacks to it. It needs to warm up for a couple of minutes before you transmit so the frequency is rock solid. I also found the alignment to be a bit cumbersome, but that may be because I haven't built a kit like this before. While the audio is acceptable, I feel that it could be a bit louder, but it definitely beats the Pixie's quiet and wide-open receiver any day. For the completed project, I took some photos.


I set the Cub aside and waited to touch up the transmitter side of things until the next day. Turns out, the transmitter side of things was not as complicated as I had thought. In a matter of under 30 minutes, I had a fully-functional Cub, with 1.5 watts of output on 20m.
In addition to this, I built my own 50 ohm dummy load with a wattmeter output. That can be found here: https://www.qsl.net/kc6wdk/QRP/wattmeter.htm. Here is what mine looks like. I do want to note that my copper chloride etchant, used with a nail polish resist, works very well.

To close, this has been an exciting and fun adventure. Now I'm off to build a dipole antenna and perfect my Morse Code! My next test with this is to see if I can show up on the Reverse Beacon Network, or RBN.
If you also want to use the RBN, it's easy! Just send the following in Morse Code:
CQ RBN CQ RBN DE [callsign] [callsign] K
CQ TEST CQ TEST CQ TEST DE [callsign] [callsign] [callsign] K
The RBN looks for CQ calls, so even if you just send out CQ, there is a good chance that you'll show up on the RBN. There are thousands of operators listening on thousands of frequencies and reporting daily. If you know how to send CQ and your callsign in Morse, you'll have no problem showing up on the RBN. It is popular with QRPers in particular since QRP can be a little unpredictable as to where you will reach. Having your callsign show up on the RBN site can give you a generalization of where you can be heard and what you can work.
That's all for now from my shack. Hope you have a great New Year! Until next time...
EDIT 1/2/2023 - Just a few moments ago, I sent out a quick CQ call on the Cub using my EFHW. As soon as I finished sending my callsign, I got a report from the East coast at a distance of 963 miles, which equates to around 647 miles per watt! Not bad, especially for 1.5 watts and a crappy end-fed antenna. I'm off to build my dipole now and brush up on my Morse skills...
Friday, August 26, 2022
An analysis of the 15, 12, and 10-meter bands
Do you ever wonder if there's any ham that's not on 80, 40, or 20 meters? I sure do, especially since I mainly do my work on 15, 12, and 10 meters. I have the capability to do 6 but I don't have the tuner (hooked up, at least) yet to access this band. After about a year of on and off operating, here's my analysis of the only bands I can access at the moment. I'm capped at 10W, so this could affect my signal strength and what my experiences are.
15 Meters
15 meters is the most busiest band by far that I've heard. It's mainly stateside or contacts in the Caribbean or South America. Most traffic is FT8 or Morse but I've heard the occasional RTTY or CW from W1AW. I've also heard the fellow operator many times in the house who goes by the name Kenmore. Up to this point, this is the only frequency band that I've made successful contacts on and they've only been on FT4 and FT8.
I'd like to do more though. I have thrown out dozens of CQ calls on voice, RTTY, PSK31, and even Feld Hell, but to no avail. There are frequencies for these modes, but they're dead all the time. I have been spotted several times but no one comes back to me on these modes. It got me wondering if it could be my antenna setup, or maybe it's because my entire setup is inside.
12 Meters
12 meters is a nice band and because it's a WARC band, it's a safe haven from contest pileups. Yes, there are data and voice segments. I rarely hear traffic on this band, but during contest season, it piles up fast with people who are non-contesters. I've mainly heard voice, the occasional CW, and FT8 on this band.
Although it's a small band it's still useable, but not for me. Unfortunately, my antenna tuner refuses to load my EFHW under a 2:1 SWR without compromising power. It's just impossible! Maybe an auto tuner or different antenna can solve the issue???
10 Meters
Many amateurs report that this band is littered with stray CB operators, but from what I can tell, this band is pretty dead. Except for FT8, which is still far and few between, there is nothing here where I'm at. It's kind of sad because Technicians have the capability of using the 10m band for SSB voice and most are excited to get this privilege on HF. Unfortunately, I've not heard a single voice on this band in the entire time that I've owned and operated this radio.
10 meters is also VERY susceptible to changing solar conditions, even more sensitive than the other HF bands. Perhaps the solar weather isn't the best right now?
What should you do?
Keep calling. When I ran FT8 the first time, I had to call 15 times before someone came back to my CQ call! Given my current rate, I'd be calling CQ forever before someone came back to me on voice or RTTY. Just because the band seems quiet doesn't mean it's dead - someone could be listening for a CQ call to answer, you just never know. There are plenty of skimmers on PSKReporter and RBN, but unfortunately they only look for CW and RTTY CQs. They claim to look for PSK31 but so far I haven't seen anyone spot my PSK calls.
You could also consider increasing your power but the magic in ham radio is doing more with less, at least I think so, so I'd strongly discourage amplifier use. In fact you're required to use the minimum power necessary to carry out a contact. If 10W can do it, use 10W. If you need 50, use 50. I'm looking at getting a Yaesu FT-891, but I think I'll wait until conditions (economic conditions, that is) improve. Better yet, you could update your antenna system. You'd be surprised how well an antenna improves your signal and station setup. I run an EFHW random wire throughout the top of my room. It tunes up well, but I'm sure a dipole would do me wonders. I could probably load easier it on 12 meters, too. For starters, placing my antenna system outside would definitely change things.
Although I think it's kind of cheating the system, ask another ham friend that lives a state over for a QSO and test how far you can go. Or you can try spotting yourself on an SDR. I've tried this and I've heard my own RTTY signals being sent, with the SDR station near Washington, D.C.. I'm sure I could hear myself sending FT8, but that's impossible to confirm.
If you're in town, consider moving to a less dense area like a park. My radio is large, but I'm sure I could take it anywhere and I'm sure it would fit on a picnic table with ease. Where I live, I have a university that I attend with lots of trees and open space - perfect for mounting a simple dipole and making some contacts!
Other things or "lurking variables" could hinder your station performance. Such things include RFI from appliances and power supplies (it's real, believe me. And yes, do yourself a favor and buy a linear or battery supply!!!), current weather and solar weather conditions, and so much more. As I've mentioned before, ham radio is one large and ongoing science experiment that we all take part in.
I hope to make some contacts on other modes. FT8 is great but it's gotten a bit too boring for me. If you'd like, tune to the 15, 12, or 10m bands - you might just find me there!
Hope to hear you down the log!
Thursday, December 16, 2021
Easy-Digi Digital Interface
Do you have a radio that you want to run digital modes on? That's great, but you know that you don't want to spend hundreds of dollars on a sophisticated interface. Let's face it - a soundcard interface is made up of audio transformers and a way to key your rig, so why pay more for something so simple?
I want to talk about the most simplistic interface board ever created. It's so simple that one could even homebrew their own! It's the Easy-Digi interface, available on eBay. This neat little gadget is sold by KF5INZ on eBay for a VERY reasonable price. The board is easy to follow and can be wired up to your satisfaction and need.
Monday, November 29, 2021
The Thanksgiving Quest
I just returned from spending Thanksgiving out in Mesa, AZ. While there, I figured that I'd browse around the local area to see if I could find any trace of ham radio. Surprisingly, one hot spot popped up, and it was Ham Radio Outlet in Phoenix.

So I stopped in "just to browse." Browsing turned into curiosity, which turned into me purchasing a few books. I am still relatively new to the hobby, so I figured I'd ask around for some advice. Needless to say, I got more information than what I had bargained for!
I had asked the man at the counter, Mike (K7DD), if he knew anything about antennas, and his response to me was "you'll be dealing with them all your life! They are the most important part of your setup." No kidding! I asked him what I should use for my station, as my base station at the moment is a Kenwood TS-660. He told me to use something like an EFHW with a 9:1 balun/unun, along with a tuner, resonant at 20 meters. That way, I would get more band coverage without having to change antenna wires. Below is the ARRL's kit version of an EFHW.
If you know me, I'm always up for learning new things, so I asked him what he recommended for learning CW. I only know how to call CQ and my callsign, but I want to learn how to carry on an actual conversation. Mike told me that he would share with me some information and resources about learning CW by using the Koch method.
In my previous post, I had mentioned the Koch method, but never really knew the history behind it. Ludwig Koch was a German psychologist who lived during WWII. During this time, he worked (loosely) with Hitler to train Nazi radio operators to learn Morse Code. His method picks up where Farnsworth's method falls short - it is the easiest way to learn and maintain code. Again, if you'd like, you can learn code using the Koch method using LCWO.net. It's free and it actually helps!
After we talked about learning code, I asked Mike about the Pixie kits. I had posted a question on QRZ.com which discussed the best antenna choice for a Pixie. 90% of the answers said that I should use a 40-meter dipole.
Here's the issue: I live in a city, with trees and power lines surrounding my house. I don't have to worry about HOA rules, so that's a plus. A 40-meter dipole measures roughly 67 feet, and I would only have room for about half of that! So what are my options?
Again, an EFHW is the answer. They work just as well as a dipole and can be put in smaller spaces. The only drawback with an EFHW is that you NEED a tuner to tune to your specific band. But a tuner can be easily built, or even purchased for an inexpensive amount. So in the end, an EFHW is well worth the effort.
I still have several questions, but Mike answered most, if not all of them (Thank you Mike for the invaluable information!), and has given me a reason to visit HRO again! Soon, I will get my station set up, and you might hear me more often on the air.
If you're interested, check HRO out on the web or visit a destination near you. Trust me, you won't be disappointed! Click on the link here to get started, and who knows? Maybe you'll find some information or a product that's right for you!
Until next time, 73!
Subscribe to:
Posts (Atom)